Description
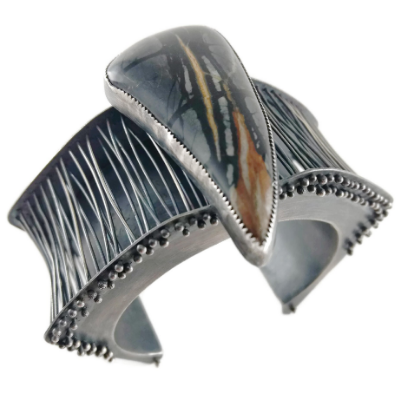
Everything I make is made from sterling silver. I use sheets of sterling silver and wire as well. Most of my bracelets are constructed from sterling silver rectangle wire measuring 5mm wide by 2mm thick. I hand saw each bracelet to 6" lengths. Then I hand saw a piece of 16 gauge square wire to it that is also measured at 6". Once this is complete I use hard solder to solder on the square wire to the rectangle wire using my Smith Mini torch which heats the metal to 1540 degrees. Once this is complete and I have cleaned the metal very well I take the bracelet, which is still flat, and hammer it (with a rawhide mallet) around a steel bracelet mandrel completing the shape. After this I take a #80 drill bit (which measures .0135 inches) and drill random holes in the 16 gauge square wire. I then take 24 gauge sterling silver wire and cut each piece to approx. 1". I ball the ends of one side of each wire by using the Smith Mini Torch. Then I thread each individual wire through the holes I drilled and using the same method for balling the first ends, I ball the other ends completing the "pins". Now it's time to make the bezel! I pick out a stone I want to use that I source from all over the world. Some come from Colorado, some come from India, others from California and some from Tibet. Most are from India. Once I've chosen the stone I want to use for the bracelet I grab my bezel wire which either measures 1/8"x26 gauge or 3/16"x26 gauge depending on the height from the girdle to the top of the stone. I wrap the appropriate bezel wire around the stone. measure it and mark it. Then I take my jewelers saw with a 8/0 size saw blade (about the size of a few strands of hair) and saw the bezel wire to fit. Then I take my Smith mini torch and solder the bezel wire together. I grab my 24 gauge sheet of sterling silver and hand saw (using that tiny saw blade!) a piece that that will work for the back plate of the bezel. I then take my hallmark stamp and hand stamp my initials and .925 on the back of the bracelet. Once that part is done I flux the bezel wire and the back plate (it's a mixture of denatured alcohol and boric acid that I buy at lowe's to keep the sterling silver from getting dirty while I heat it up) I place the bezel on the back plate and individually cut enough pallions of solder and place them individually inside the bezel wire to solder the bezel to the back plate. Once I've cleaned the metal again I take my hand saw and cut off any excess of the sheet. Then I take a #4 Swiss file and hand file the excess silver down to be flush the the bezel wall. Usually after this I use my Flex Shaft and a brown wheel (it's like an industrial strength dremel that is way better! hahaha!) and clean up the file marks. Once this is done I figure out the orientation of where I want the stone to lay on the bracelet. I dip it in flux again, place some medium solder on the back of the bezel where I want it soldered to the cuff bracelet and heat the solder until it flows. I clean the bezel again, pickle it again and then balance it where I want it to go on the cuff. From here I sweat solder the bezel onto the bracelet. Once I'm done with all of this I clean the metal again, file down the ends of the cuff with my #4 swiss file and use the brown wheel on my flex shaft to make the ends of the cuff smooth. From here it is time to oxidize the sterling silver. So I take liver of sulphur and really hot water. I dissolve the chunks of LoS in the hot water and dip the bracelet into it. After about 15 minutes the piece is completely oxidized and i take it out and wash it in cold water to stop the oxidation process. I take steel wool and hand polish it to highlight the raised parts and the pins while leaving the lower parts dark. Once I've gotten that entire process down it's time to tumble the bracelet. So i put it in my tumbler with steel shot, cold water and Sunsheen steel shot cleaner and let that run for about 45 minutes. Afterwards I take it out, rinse it, dry it off and now I begin to set the stone. First, you place the stone into the bezel wire. Then you take the bezel pusher, or a hammer or a hammer hand piece depending on the piece and proceed to go around the bezel in a specific pattern pushing the bezel wall down. Once it is perfectly flat and the stone no longer moves, I take the planisher and go over the edges of the bezel wall one more time to ensure that the stone is set correctly. Plus it adds a tiny bit of shine to the edges of the bezel which no one except me probably notices. And VIOLA! I have one sterling silver bracelet.
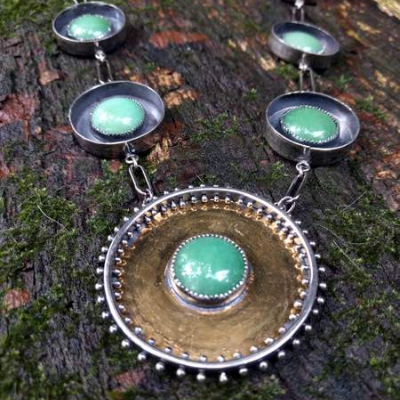
For my necklaces it is all the same steps as above but I also hand make the chain too! I take 18 gauge sterling silver round wire and wrap it around a wooden dowel creating a spring. Sometimes I use 1/4" dowel. Sometimes I use 3/16" dowels or way bigger just depending on the look I am going for. Once I have a bunch of these silver "springs" I take my jeweler's saw and cut each individual jump ring off of the spring. I solder each jump ring together using hard solder and my Smith Mini Torch creating little rings. Again, this is all dipped in flux and each individual pallion of solder is hand cut and placed using a tiny pic. Once all the ring are soldered together I take a reverse action pliers and actually open the jump rings up to create an oval. Once all the circular rings are made oval I take some SUPER TINY oval jump rings that I made and attach them together creating the chain in the necklace pictured here. Each chain is between 18"-40" long and uses anywhere between 60-150 individual larger jump rings and 60-150 of the smaller ones. The clasp is then handmade as well. I cut 16 gauge round wire to whatever length I need depending on what size clasp I need. Then I take a cup bur and cup bur both ends of the wire so that the ends have no weird scratchy burs on the ends. I then take various pliers and shape and hammer the clasp until it's the shape I want and solder that onto the last link of the chain on my necklace. Once this is complete I do the same thing I did with my bracelet. I oxidize it using Liver of Sulphur. I steel wool each link. Then I tumble it to make it extra shiny and set the stones.
For my rings i literally do all that again except I create each shank individually. Sometimes I use half round sterling silver wire. Sometimes I use square wire. sometimes I use sheet metal and hand saw out the ring shank. It's always flat and I measure down to the one hundredth of a millimeter the correct length. File the ends perfectly flat and then use my half round pliers to bend the shank ends together. Once i get the ends PERFECTLY flush I flux and solder the ends together. Then clean the metal. Now I take the shank and put it around my steel ring mandrel and using a rawhide mallet again hammer the ring until it is perfectly round. Once here, I go back to my bench, grab my #4 half round swiss file and file off the excess solder on the inside and outside of the solder seam on the ring shank. Then i take a tiny round steel mandrel on my flex shaft and using various grits of sandpaper I repeat this process until you can no longer see where I soldered the ring together. Then I take the bezel that I'm inevitable soldering onto the ring which is made the same way as everything else I've mentioned and sweat solder it onto the ring shank. After this I repeat the oxidation process, tumbling and stone setting and BAM! we have a ring.
Earrings are super fun because I basically have to produce 2 identical pieces. I use sterling silver, stones and pins in this as well. So i do all the same steps above:
1. make the bezel
2. solder it onto a back plate
3. clean up the back plate
5. solder on jump rings to attach it to the pinned hoop
6. make the pinned hoop (16 gauge square wire that I make in to hoops similar to the handmade chain mentioned above except i drill a bunch of holes in it and ball the ends of 24 gauge wire to make the pins in it)
7. attach everything together
THEN I make the ear posts by using 21 gauge half hard wire. I cut each piece to approximately 3/4". File each end flat with my #4 swiss file. Using easy solder (melts at 1300 degrees rather than 1540 to keep all the other solder joints from remelting at this point) I solder on each individual post. Then I take my needle nose pliers and twist the posts to work harden each post so they don't bend. I cut each post again to the exact length I need and use a cup bur on each end to smooth out the burrs created by cutting them so they fit smoothly in ear lobes.
8. Liver of Sulphur
9. Steel wool
10. Tumble
11. Set stones.
As far as the percentage of what I sell... I typically have a breakdown of 30% earrings, 30% bracelets, 20% rings and 20% necklaces. But it really just depends because sometimes I fluctuate between loving making one type of jewelry versus another.
All of my silver I purchase from Rio Grande which SWEARS the ethically source their silver. I know the copper they use comes from Michigan and they use a lot of recycled silver because every jeweler sends in their scraps to get credit towards more stuff. But I can't say 100% HOW ethically sourced it is. Everyone nowadays says everything is ethically sourced and that just isn't feasible. But anyway... My stones come from all over. I've made relationships with a lot of lapidary artists so I buy stones from them. but those stones are sourced and mined all over the world. Afghanistan, Pakistan, China, there are a lot that come from the US and Canada. It just really depends on the stone.
Pickup
Not available
Seller does not offer local pickup
Delivery
Not available
Seller does not offer delivery
Ships
Not available
Seller does not offer shipping
Keywords
Producer Jewelry Necklaces Necklace Handmade Jewelry Handmade Sterling Silver Sterling Silver Jewelry Turquoise Jewelry