Below is an overview of Scheduler, the easiest and most complete way to book vendor booths for upcoming events.
How to launch Scheduler:
There a couple of ways to access Scheduler.
- In the main Dashboard view located in the Next Event card.
- In your lefthand toolbar
- In each vendor record
Navigating Marketspread Scheduler:
The diagram below points out the basic components of Marketspread Scheduler.
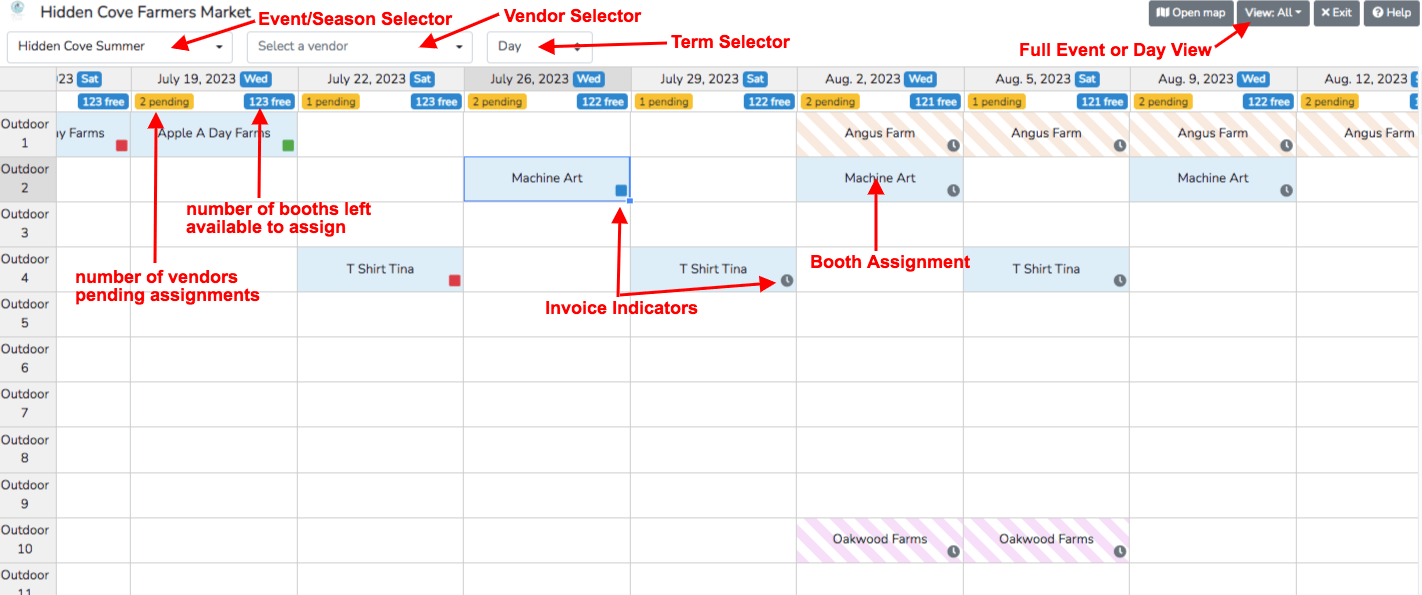
Event / Season Selector Quickly jump between views of your active Events
Vendor Selector Select a vendor to manage in Scheduler
Term Selector Choose whether you are booking by Day/Week/Month or Event based Terms
Event or Day View Selector Toggle between full Event view and a day view
Pending Indicator Alerts on the number of vendors who would like to be scheduled for that event day
Free Indicator Notification on number of remaining free booths for that event day
Vendor Booth Assignment Vendor assigned in a particular booth
Invoice Status Indicator Shows the status of an automated invoice (yellow=invoice not created, blue=invoice created but not paid, green=paid invoice, red=overdue invoice, grey clock=invoice draft will be release according to schedule)
The diagram below points out additional components of Scheduler when a vendor is selected.
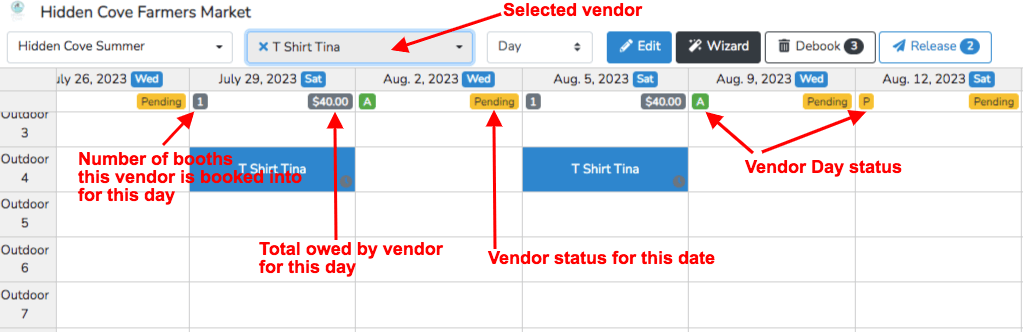
Selected Vendor Currently selected vendor
Edit Mode Toggle between view and edit mode
Number of Assigned Booths Indicates the number of currently assigned event day booths for selected vendor
Event Day Invoice Amount Invoice amount for event day for selected vendor
Vendor Day Status IndicatorDay status set by event manager [ "A" accepted, "W" waitlisted, "P" pending ]. The rejected and not attending status do not show in scheduler.
Vendor Pending Indicator Indicates which day vendor selected to attend in their application
Overview of Pending buckets:
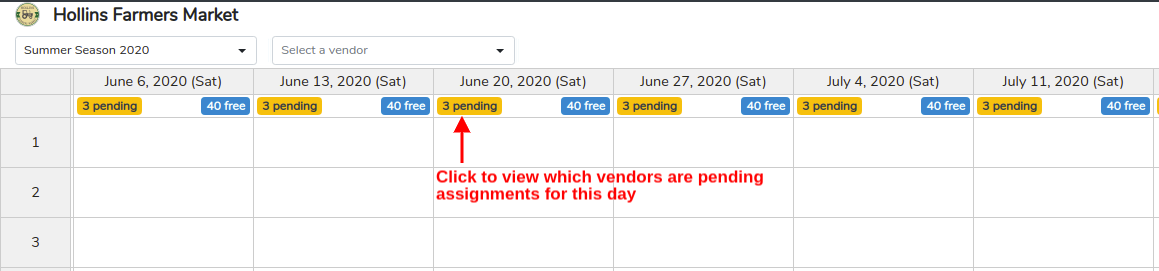
Marketspread has a process feature called vendor pending buckets. These control visual indicators in Marketspread Scheduler that alert you which vendors you need to schedule for a particular event day.
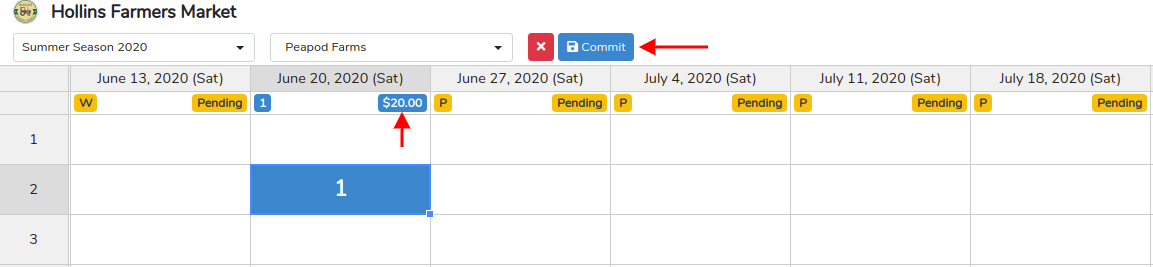
As an example, notice the yellow column header blocks in the image below. These represent the vendors in the pending bucket that still need to be scheduled for that day.
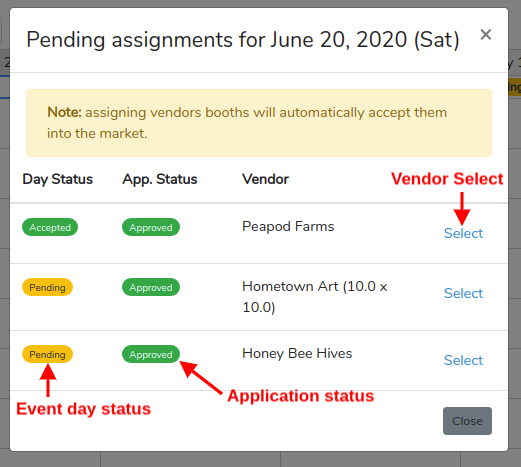
To see the list of vendors for any of your event days simply click on one of the pending indicators.
This will open a window with a list of vendors that have indicated they would like to attend on that event day, alongside their current status in the event and their applicaiton status. Generally, those with Accepted day status are ones that you committed to assigning for that event day. The vendors with other statuses (such as Pending and Waitlisted) are ones that submitted to sell for that day but that you have not yet commited that they will have a booth. Note that assigning any vendor to an event day where the vendor has a status other than Accepted will automatically update them to an Accepted day status. Clicking on any of the blue vendor Selectlinks will automatically select that vendor in Scheduler for you to start making assignments.
Assigning a Vendor to a Booth:
On the left side of the screen, you see your booths. Across the top, you will see your event days. Scroll left/right through Scheduler to find the dates you want to assign. Scroll up/down to find the booth number you want to assign.
At the top of this screen, use the drop down menu to choose the vendor you want to assign a space. Once you select that vendor, a comment / audit log will automatically appear to the right. Here you will see an audit of all actions between your market and that vendor. If you scroll to the bottom of the right-hand log you will be able to add comments that will get recorded in the log and are sent to vendors as email. You will also see the answers to any application questions you have "pinned to scheduler"
Once you select a vendor, you will see several choices to the right of the vendor name:
Term Choose between booking this vendor by the Day/Week/Month or Event if your layout is set up for these options
Edit Clicking this lets you edit this vendor's assignments in scheduler
Wizard book this vendor via the "Wizard" instead of in scheduler
Debook Bulk "debook" or "remove" vendor from previously scheduled booths
Release provides options to release draft invoices created for this vendor

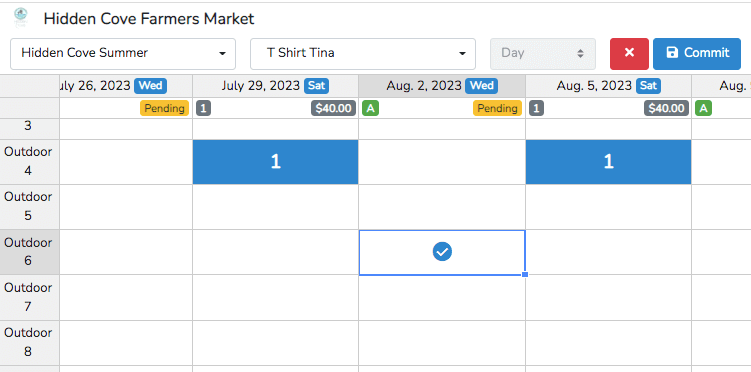
Click “edit” to enter edit mode and begin assigning spaces - example below.
Click on the box corresponding to the date/booth you wish to assign to your vendor. You can either click the blue checkmark to assign 1 space at a time.
or
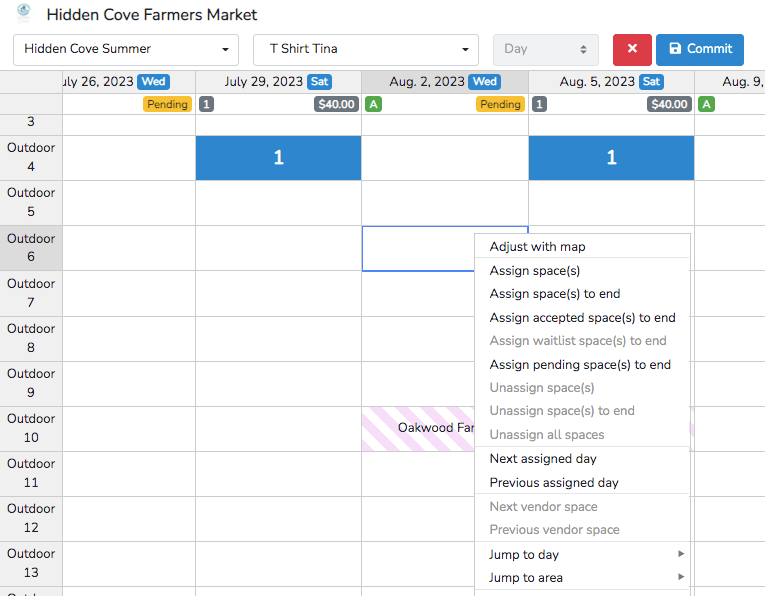
Similar to a spreadsheet, you can select multiple boxes by holding down the shift or control keys. Then either right click (for a PC) or control click (on a MAC) to bring up a drop down menu. Select “Assign Space(s)” from the drop down menu.Notice that you can also select "Assign space(s) to end", "Assign accepted space(s) to end", "Assign waitlist space(s) to end" and "Assign pending space(s) to end". Each of these is a way to assign a vendor particular booth or booths for from that day forward to the end of the event season.
Once you select “Assign spaces” it will highlight in blue all of the booths to be assigned to that vendor. If you have booth fees configured you will then see the amount the vendor owes you automatically calculated at the top of the column for that day.
Click “commit” to confirm these assignments.
After clicking “commit” you will get a confirmation window for you to review the changes. If it all looks good, click the blue “confirm” see example below.

Your vendor is now assigned to those spaces for your selected event days. If the event day is published any new assignments will be reflected in your event map. Click here to learn more about publishing your market map.
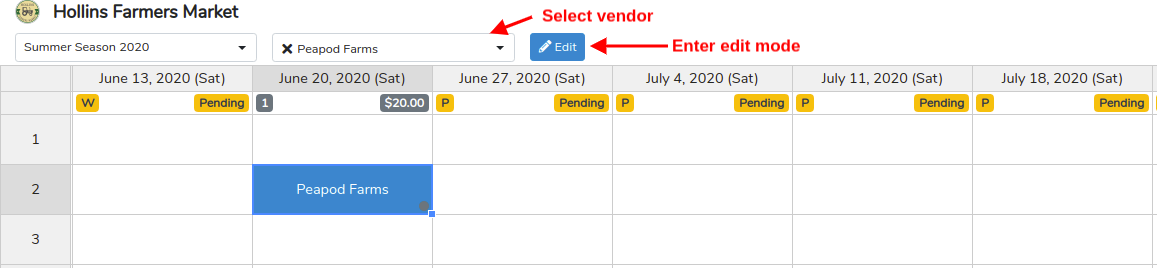
Unassigning Vendors from Booths:
To unassign a vendor, select the vendor from the V****endor selector dropdown then click the blue Edit button.
Then highlight the event days (cells) that you would like to unassign the vendor. Right click the highlighted cells and select the Unassign space(s) option.
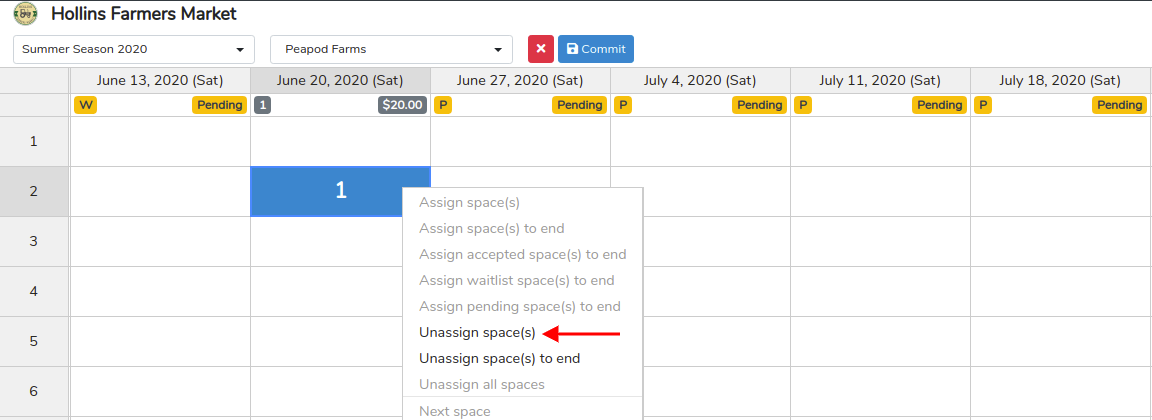 

Note, to optimize unassigning vendors you are also presented with options to "Unassign space(s) to end" and "Unassign all spaces". The Unassign space(s) to end will unassign that vendor from all spaces to the end of the event season. The Unassign all spaces will essentiall unassign the vendor from all spaces in the event season.
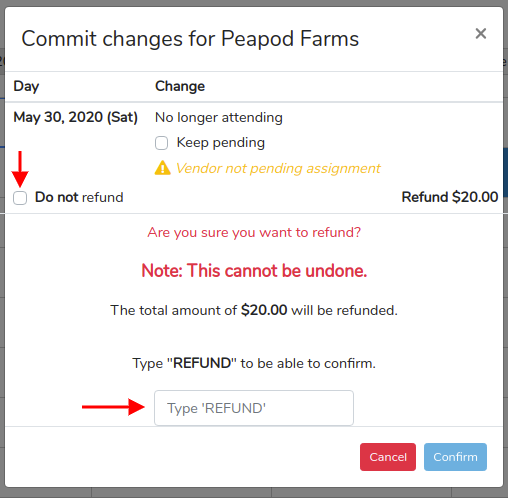
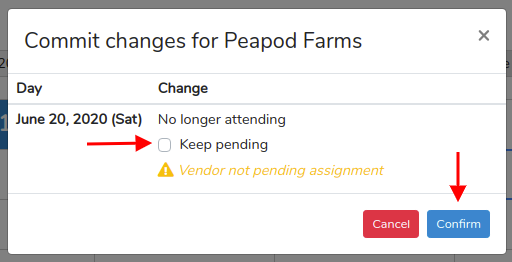
After that click the blue Commit button at the top. You will then be prompted to confirm that unassign transaction. There are two cases for comfirmation:
- The case where there is no invoice or the invoice has not yet been paid the confirmation will not provide the Do not refund option (as seen below).
Note the Keep pending option. Selecting this will put the vendor back in the pending bucket for the days you are unassigning them. By doing this they will continue to show up in the pending indicators to be scheduled for the event day(s). The Keep pending is usually for when you are unassigning vendors with the intention of reassigning in a different booth on the same day at some other point in time.
- When the booths have invoices associated with them that have been paid. In this case the confirmation will give you an option to automatically mark the invoice as refunded or not. If you are using the integrated Credit Card payment option all refunds are automatically processed via the Credit Card processor. For all other payment methods, the invoice will automatically be updated to refunded but you will need you to physically refund the money to the vendor. If you select the Do not refundoption the invoice will not be updated as refunded and Credit Card payments will not be automatically returned via the processor.